

How To Install Hardie Board On Wall
How to Install Cement Board for Tile Projects
The best base for ceramic tile is waterproof cement board.
![]() Fourth dimension
Fourth dimension
A total solar day
![]() Complexity
Complexity
Beginner
![]() Price
Price
$51–100
Introduction
Installing cement board correctly is the most critical role of a first-class tiling project. Here's how to do it.
Tools Required
Materials Required
- ii ten 4s
- Cement board
- Cement board screws
- Fiberglass mesh tape
- Thin-set up mortar
Stride 1: Overview
Motility over solid mortar bed, and say hello to cement boards. The traditional method of installing ceramic tile called for setting information technology in a solid mortar bed. Troweling a perfectly flat bed required not bad skill, but the reward was a tile task that lasted for decades. Today, virtually professional tile setters dorsum their tile with cement board instead, considering it offers well-nigh the same immovability with a lot less work. And the best part? Do-information technology-yourselfers can utilise it too.
Cement lath is a thin layer of mortar sandwiched betwixt sheets of fiberglass mesh cloth. The 1/2-in. thick board is unaffected by water, making it a great substitute for a mortar bed.
In this article, we'll prove yous how to create a potent, durable and waterproof tile base around your bathtub using cement lath. We chose the tub surround because information technology'due south highly leak-prone, and an ideal spot for cement backer lath. Although cement board is heavy and a scrap awkward to cut, even a novice should be able to complete a professional person-quality tub environs, ready to tile, in a day. (Allow one-half a day to tear out the quondam tile and perhaps several more than days to let clammy wood dry.) Once you are done installing the cement board, here are some bathroom tile trends you'll desire to explore.
Figure A: Cement Board Installation Details
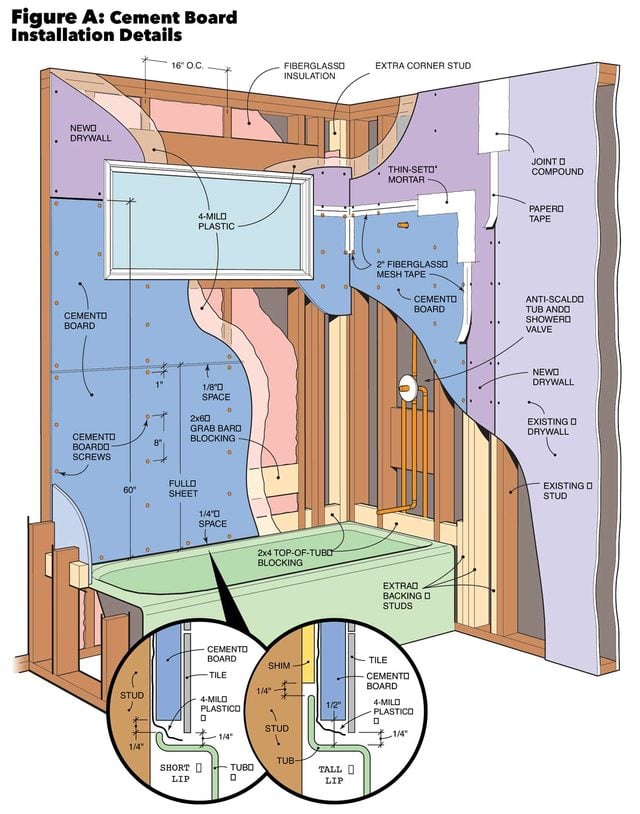
Add blocking and other framing details earlier hanging the cement board.
Project step-by-step (18)
Step 1
Buying materials
Cement board, technically called cementitious backer unit (CBU), is manufactured under different brand names. The standard size sheet is 3 10 5 ft. and 1/2 in. thick, weighs 45 to threescore lbs. and is available at most full-service lumberyards and edifice supply centers. The 1/2-in. thick cement board spans studs spaced 16 in. on center. Other sizes, like 3 10 4 ft., 3 x 6 ft. and four 10 four ft., are available, but you may have to contact a tile supplier to find them. Our project, tiling the walls around a standard 5-ft. tub to a height of 6 ft., requires four 3 x v-ft. sheets.
To attach the cement board to the studs, yous'll need special 1-1/iv in. cement board screws (meet Fig. B). These screws have a coating to resist corrosion, a special wide head with cutting flutes and hullo-low threads for a strong grip. If yous can't find them at a domicile center, call tile specialty stores. If special screws aren't available, attach the cement lath with 1-one/two in. hot-dipped galvanized roofing nails.
You lot'll also need a roll of 2-in. wide fiberglass mesh cement lath tape and a 25-lb. handbag of thin-set agglutinative, both available at habitation centers. For the fiberglass mesh tape exist certain to use the special, heavier blazon sold for use with thin-ready mortar, equally regular drywall mesh tape will rot. The thin-set is a cement-based powder that you mix with water or latex additive to class a thick paste, which is used to seal the seams in the board and can also exist used to set the tile.
Finally, you'll need an 8 ten 12-ft. piece of 4-mil plastic sheeting and some direct 2x4s.
Step 2
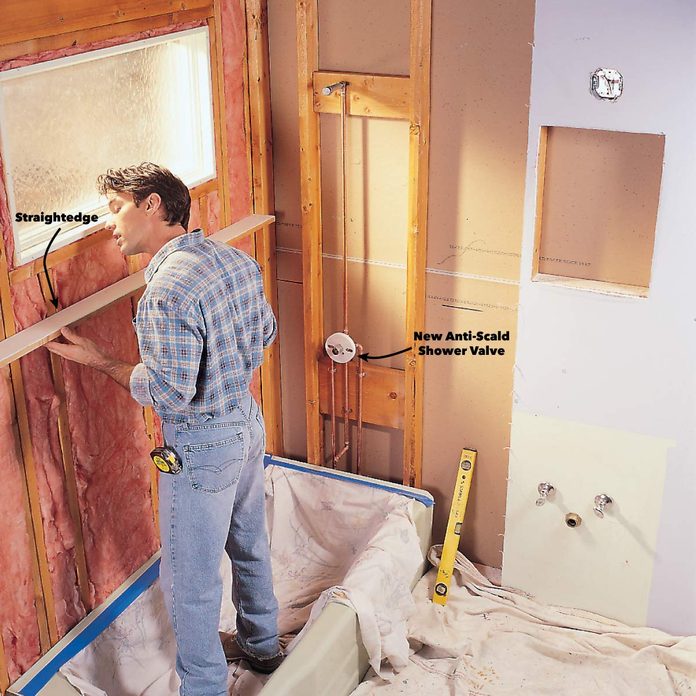
Bank check for bowed studs
Protect the bathtub with a dropcloth and seal the edges with tape to keep out droppings. Tear out the one-time tile and backing to the bare studs. You'll have to remove the faucet handles, tub spout and shower head.
At present's the time to straighten crooked studs. This is a critical pace. Tile is easier to set and looks better on a straight wall. Press a straightedge against the studs. Shim low spots with strips of roofing felt stacked up to the correct height or with sparse strips of wood. You lot tin also spiral or smash a straight stud alongside a crooked i.
![]()
Stride 3
Add blocking
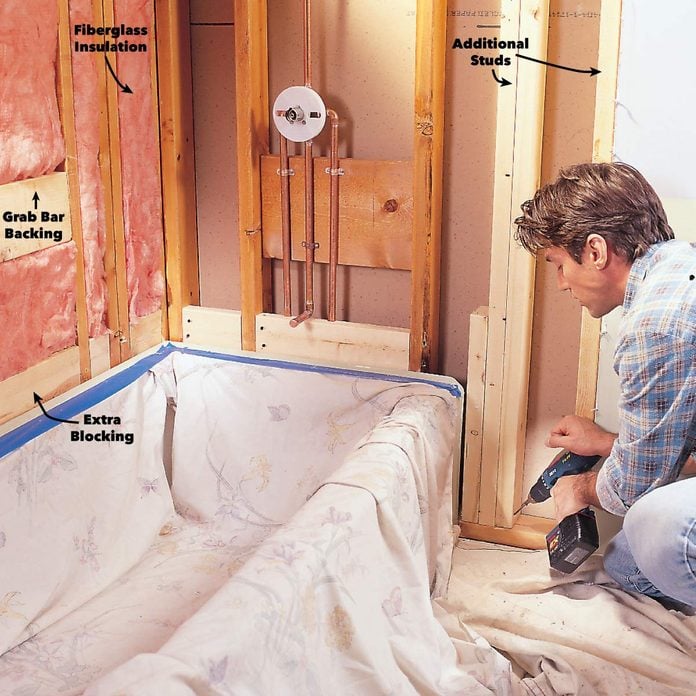
Actress blocking installed at present makes it easier to screw in the edges of the cement lath later. Screw full-length studs to the framing to support the outside edge of the cement lath. Add studs to the inside corners if necessary. The goal is to provide at least 1-i/iv in. of backing at every edge. Screw in blocking at the top border of the tub to support and strengthen the lower edge of the cement lath. Add wood backing where grab bars, shower drape rods or shower doors will be.
Mensurate the thickness of the drywall or plaster where the cement board will see it. If this dimension is more than 1/2 in., add strips of wood to the studs so the cement board will exist precisely flush with the old wall.
Footstep four
While your walls are open:
- Add together wood blocking now where you will be installing towel bars, grab bars or shower doors; so you won't take to rely on those frustrating trivial plastic anchors to concord up your fixtures.
- Upgrade the insulation on outside walls with new, college R-value fiberglass batts.
- Yous tin supersede your old tub faucet with a new pressure level-balancing shower valve.
Step v
Waterproof the walls
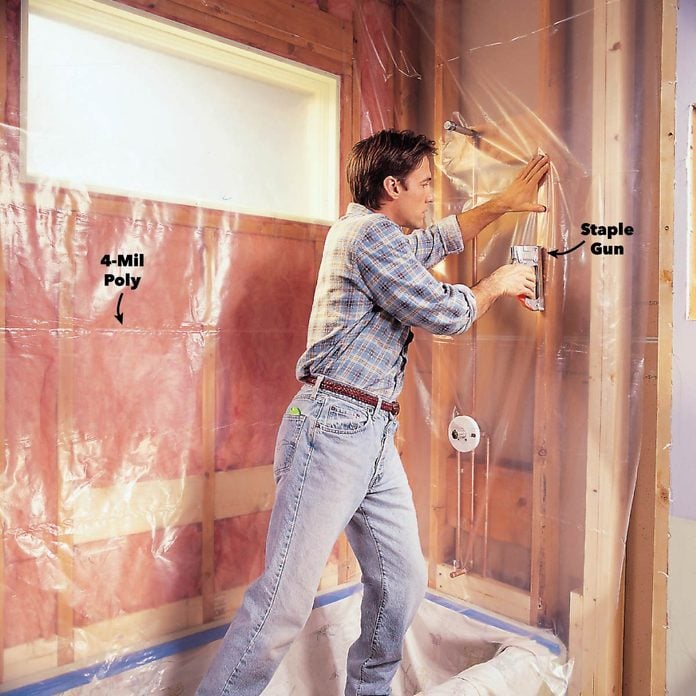
Add the vapor barrier. Staple 4-mil plastic sheeting to the framing. Drape the plastic into the tub and cut information technology off later the cement lath is installed. Use a unmarried slice to avoid seams. Push the plastic tightly into the corners earlier stapling to avoid creating a span of plastic that will tear when you install the cement board.
The plastic serves equally a vapor barrier for the insulated wall and as a last defense force against any h2o that may sneak through the tile and cement board.
Step 6
Advice nigh gaps in cement boards
Hanging cement board is one job where gaps are desirable. Infinite the lesser sheets one/iv in. above the tub lip to allow for movement of the tub and floor. Employ nails or screws equally temporary spacers to create a i/8-in. gap between sheets of cement lath. When yous squeeze the thin-ready mortar into this gap, it volition lock the two sheets together and strengthen the seam. Finally, leave extra clearance around each piece past deducting about 1/4 in. from your measurements before you mark the cement board for cutting. Believe me, you want to avoid the knuckle-skinning task of trimming a lilliputian off. Whatsoever gaps will be covered with mesh record and thin-gear up.
Step 7
Hang the cement boards
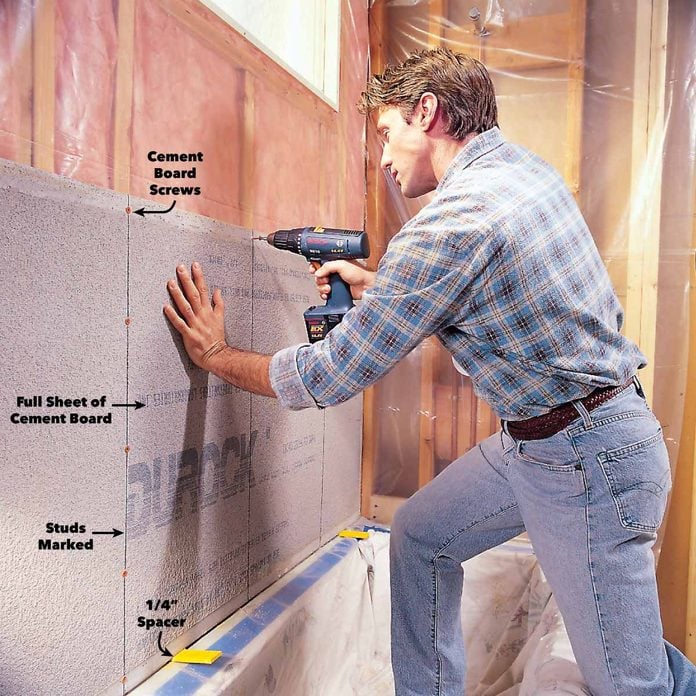
When the prep work is done, start the rewarding job of hanging the cement board. All your difficult piece of work will commencement to pay off as the offset canvas goes upwards.
Spiral a full-size iii x five-ft. cement lath to the dorsum wall. Place special 1-i/four in. cement lath screws every 8 in. along each stud but i in. away from edges to avoid breakage. Hold the sheet in a higher place the tub shoulder with 1/4-in. spacers. Bulldoze screws affluent with the surface of the board, being conscientious not to break through mesh. Avoid driving them at an angle.
Step 8
Spiral the board in place

Continue screws 1 in. away from the edges.
Cement lath has a smoothen side and a rough side. Face the rough side out if you will exist using thin-ready mortar adhesive to install the tile simply the smooth side out if you lot will be using latex mastic.
Step ix
How to cut cement board: Score

Marking the next canvass for cutting. Clamp a straightedge along the cutting line, and utilize it as a guide to score the cement lath with a utility pocketknife. Score the full length of the canvas nigh five or 6 times using firm downwards pressure.
You'll ruin a couple of knife blades while cutting, and so continue some extras handy.
Stride x
Snap

Snap the lath along the scored line by laying it over the edge of your piece of work surface and pressing down. Agree the broken-off slice while you cut through the fiberglass mat on the dorsum.
Pace 11
Remove
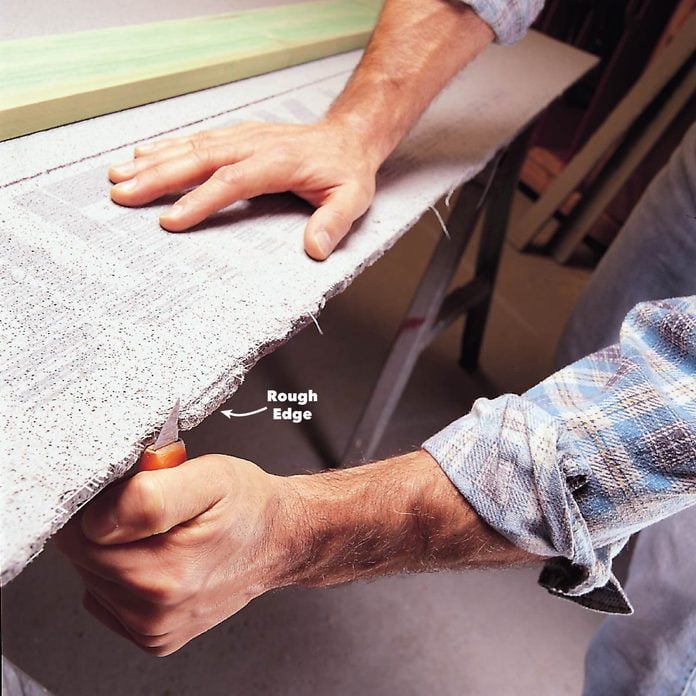
Remove bumps and rough edges with a utility knife or a wood rasp with a replaceable blade.
Step 12
Use a jigsaw to cut shapes
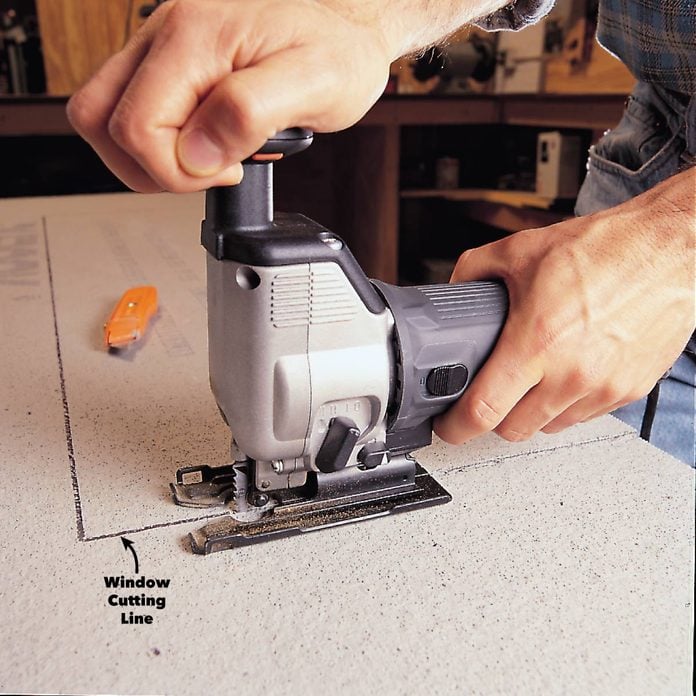
Saw the two sides of the window notch using a jigsaw. Then score and break out the residue using the procedures we showed in step nine.
Employ carbide grit jigsaw blades to cutting cement lath. You lot tin also use regular blades, though they'll wear out afterwards a few cuts.
Step 13
Find centers for plumbing fixtures

Measure from the back wall and upwards from the tub shoulder (plus the 1/4-in. spacer) to detect the centers of the valve, spout and shower head. Brand a sketch of the wall showing the dimensions and hole sizes. Add together one/2 in. to the hole diameters for an easier fit.
Step 14
Drill small holes
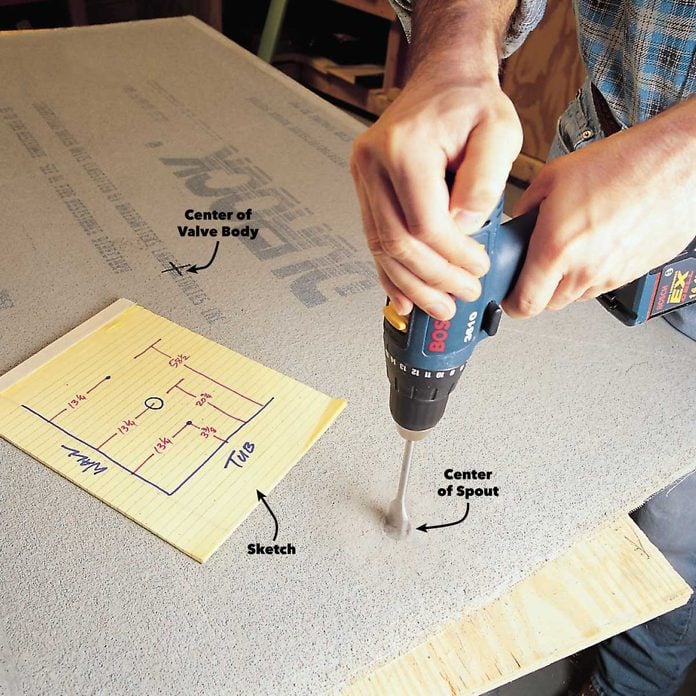
Marking the hole centers on the cement board. Drill holes smaller than ane-1/2 in. with an old spade flake or a carbide-grit hole saw.
Step 15
Punch out large holes
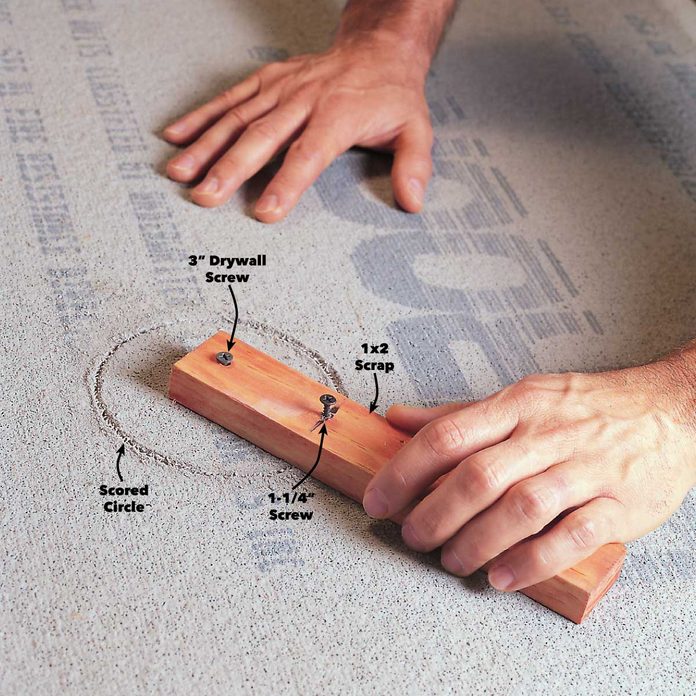
Construct a homemade circle cutter for larger holes. Drill a small pigsty in one end of a chip of wood, attach information technology to the cement lath at the centre of the circle, screwing through the cement board into the work surface below. And then screw in a "cutter" spiral where y'all want the circumvolve to be scored, for example, 2 in. from the center for a iv-in. hole. Allow the point to stick out the bottom. Spin the cutter while applying force per unit area to score a perfect circle. Repeat the procedure on the other side. As shown in the inset photo, pound out the circle with your hammer. Be conscientious not to damage the edge of the pigsty.
Step 16
Finishing upwardly: Set the sheet on spacers
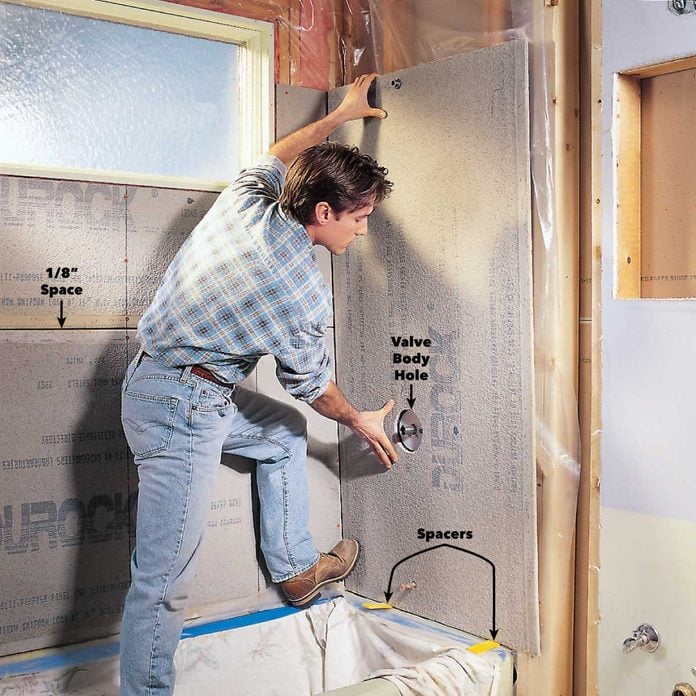
Ready the completed sail in place, spacing it above the tub shoulder with ane/4-in. shims, and screw information technology in. Consummate the opposite wall and the small pieces next to the tub.
Step 17
Utilize special mesh tape on seams

Complete the task by piecing in any missing drywall and taping the seams. Cutting drywall to fill in between the existing wall or ceiling and the cement board. Screw the drywall to the studs. Encompass all of the corners, joints and seams, including the joint where drywall and cement lath meet, with the fiberglass mesh tape.
Footstep xviii
Tape the seams with mortar

Following the manufacturer's recommendations, mix the thin-set mortar adhesive with enough h2o to form a thick paste. Wear a NIOSH-approved dust mask when mixing the pulverization. Spread the thin-gear up over the tape.
Cover the record with a skim glaze of thin-set mortar, squeezing it through the tape to fill up voids and cracks. Remove any excess fabric earlier it hardens.
When you're done roofing the tape with thin-prepare, you're ready to tile. Yous don't even have to permit the sparse-set dry. Don't worry if the tile doesn't cover the joint betwixt the cement board and the drywall. But finish it with a setting-type joint compound, which comes in 25-lb. bags of powder that you mix with water. (It'due south available at home centers.) Setting-blazon compound is stronger and more water-resistant than the type that hardens by drying. Here are 13 tips to keep in mind when choosing bathroom tile.
Originally Published: June 27, 2022

Source: https://www.familyhandyman.com/project/cement-board-ceramic-tile/
Posted by: patrickbeciond.blogspot.com
0 Response to "How To Install Hardie Board On Wall"
Post a Comment